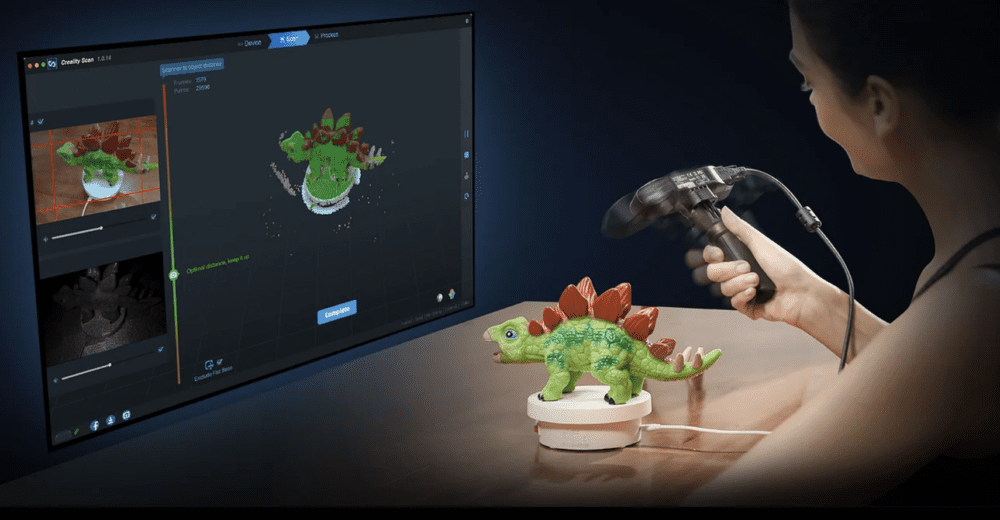
導入
CR-Scan Ferret は、最大精度 0.1 mm の高精度を提供するコンパクトな民生用 3D スキャナです. サイズが小さく、軽量です, 持ち運びが簡単になるようにする. スキャナーはクロスプラットフォーム互換性があり、Windows などの複数のプラットフォームで動作します。, マック, そしてアンドロイド (CR-スキャンフェレットプロ iOSと互換性があります).
新しいユーザーがスキャナーの操作テクニックをすぐに習得し、より良いスキャン品質を達成できるようにするため, このチュートリアルでは、さまざまなタイプのオブジェクトに対するスキャンのアドバイスとヒントを提供します。, 車を含む, オートバイ, 人体, 顔, 靴, ヘッドフォン, 等々. ソフトウェア構成の推奨事項と、実際のスキャン シナリオに適用できるさまざまなスキャン技術について説明します。.
スキャン設定
Creality Scan ソフトウェアの場合, 複数のスキャンモードが提供されています. さまざまなタイプのターゲットに適切なスキャン モードを選択することが重要です.
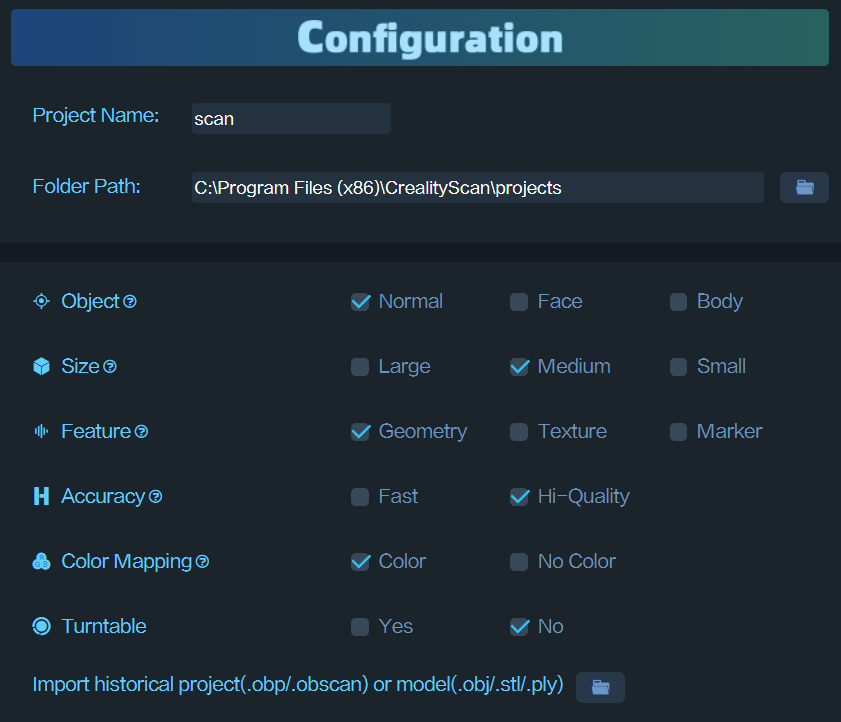
機能タイプの選択方法?
(1) ジオメトリ: 豊富な幾何学的特徴を持つオブジェクトの場合, スキャンにはジオメトリ モードを使用することをお勧めします。.
(2) テクスチャ: 幾何学的特徴が限られた小さなオブジェクト用, マーカーポイントを配置した後、テクスチャモードを適用することをお勧めします。. 非常に小さなオブジェクトの場合, マーカーポイントはテーブル上に配置できます. テクスチャーは豊富だが幾何学的特徴が限られているオブジェクトの場合, テクスチャモードはスキャンに直接使用できます。.
(3) マーカー: 信頼性の高い精度が求められる大型オブジェクト用, スキャンにはマーカー モードを使用することをお勧めします。. このモードでは、円形のマーカー ポイントをオブジェクトの表面に取り付ける必要があります。. 大きな物体用, 内径6mmのマーカーポイントを使用してください。, 一方、小さなオブジェクトの場合, 内径3mmのマーカーポイントが使用可能.
オブジェクトに豊富な幾何学的特徴があるかどうかを判断する方法?
標準的な幾何学的形状を持つオブジェクト, 立方体や円柱など, または明確な幾何学的特徴を持たない大きな平らな表面を持つ物体, 豊富な幾何学的特徴を持たない. 円筒形のマグカップなどの一般的なオブジェクト, 四角い箱, またはトラックの貨物室には豊富な幾何学的特徴がありません.
一方で, 肖像彫刻のようなオブジェクト, 靴, または人形モデルには豊富な幾何学的特徴があります.
正確さ
より詳細な情報を取得したい場合, 迷わず「高品質」を選択してください. コンピュータに専用のグラフィックス カードが搭載されている場合 (つまり. GPU), 高品質モードはよりスムーズなパフォーマンスを提供します.
大きなオブジェクトまたはコンピュータのスペックが低い場合, 「高速モード」を選択できます“ スキャン用.
ターンテーブル
ターンテーブルオプションについて, 「はい」を選択した場合, ターンテーブル平面上の点群は追跡プロセス中に削除されます。.
基本的な用語と概念
走査距離
すべてのスキャナの精度はスキャン距離に関係します. 一般的に, 点群を取得しながらスキャナがターゲットに近づくほど, 精度が高いほど. Ferret スキャナの最小作動距離は 15cm、最大作動距離は 70cm です。. 小さなオブジェクトのスキャン用, 精度を損なうことなく信頼性の高い追跡を確保するには、スキャナーをターゲットに十分近い位置に配置する必要があります。.
スキャン ソフトウェアの指示に従って「最適な距離」を維持してください。.
曝露時間
Creality Scan は 2 つのカメラ露出制御モードを提供します: 自動露出とマニュアル露出.
より大きなターゲットの場合, 顔などの, 自動露出をスキャンに使用できます.
より小さなオブジェクト用, 自動露出は正確ではない可能性があります. IRカメラの露光時間を手動で調整することをお勧めします.
露出調整チュートリアル
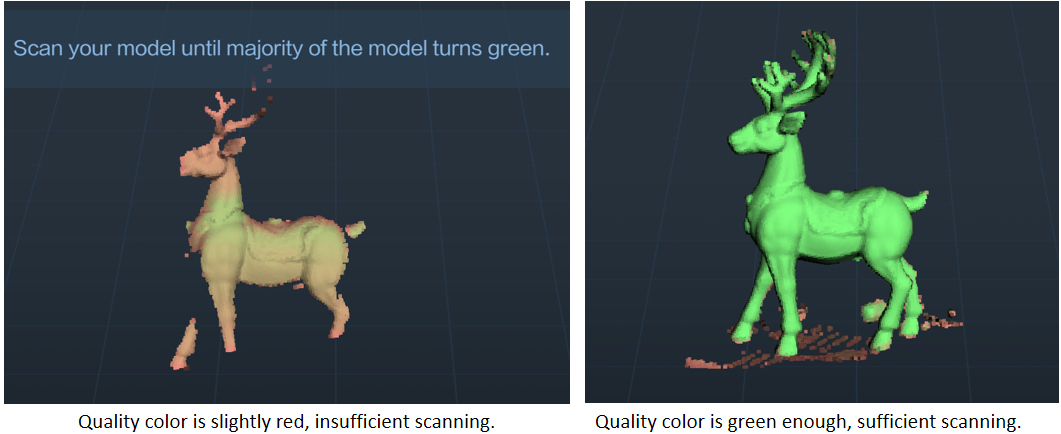
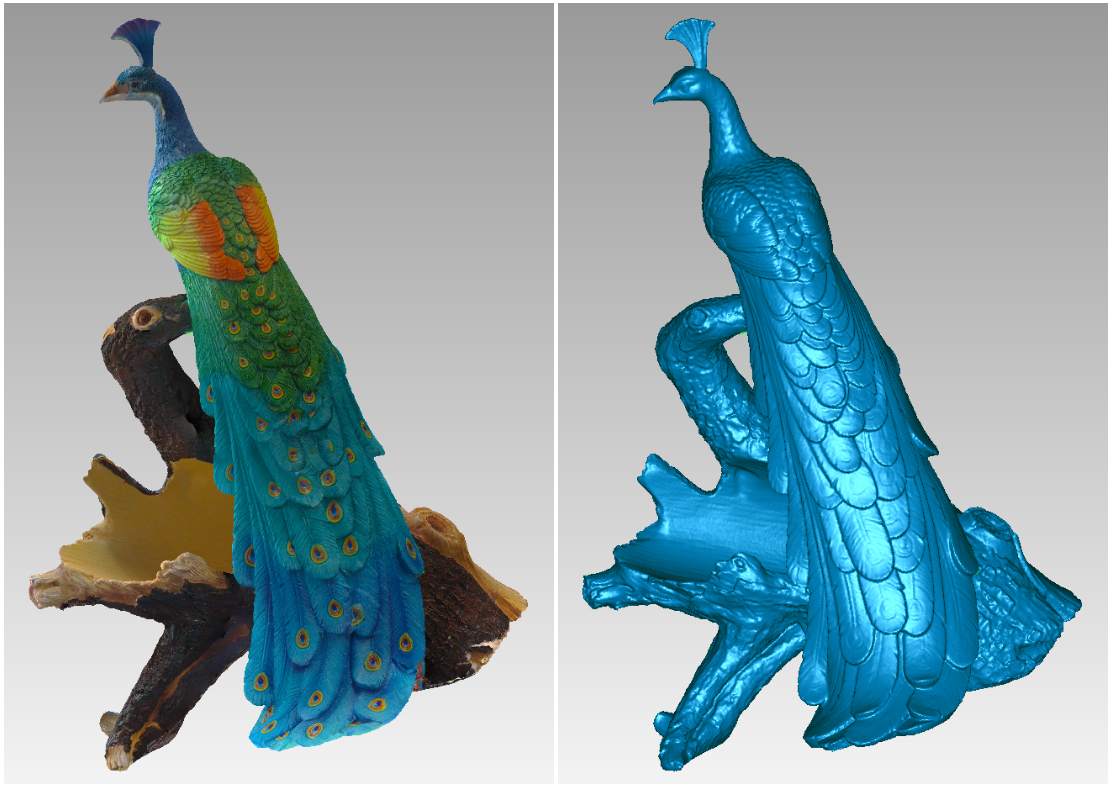
品質のカラーマップ
スキャンプロセス中, Creality Scan は、現在のスキャン品質が十分に高いかどうかを示す点群の品質カラーマップを提供します. 次の画像は、点群の品質カラーマップに基づいてスキャンの完全性を判断する例です。. 左側のオブジェクトには赤と緑が混ざっています, スキャンされた点群の品質が比較的低いことを示します, 一方、右側のオブジェクトは一様に緑色に見えます, スキャンされた点群の品質が比較的良好であることを示します.
点群の最適化
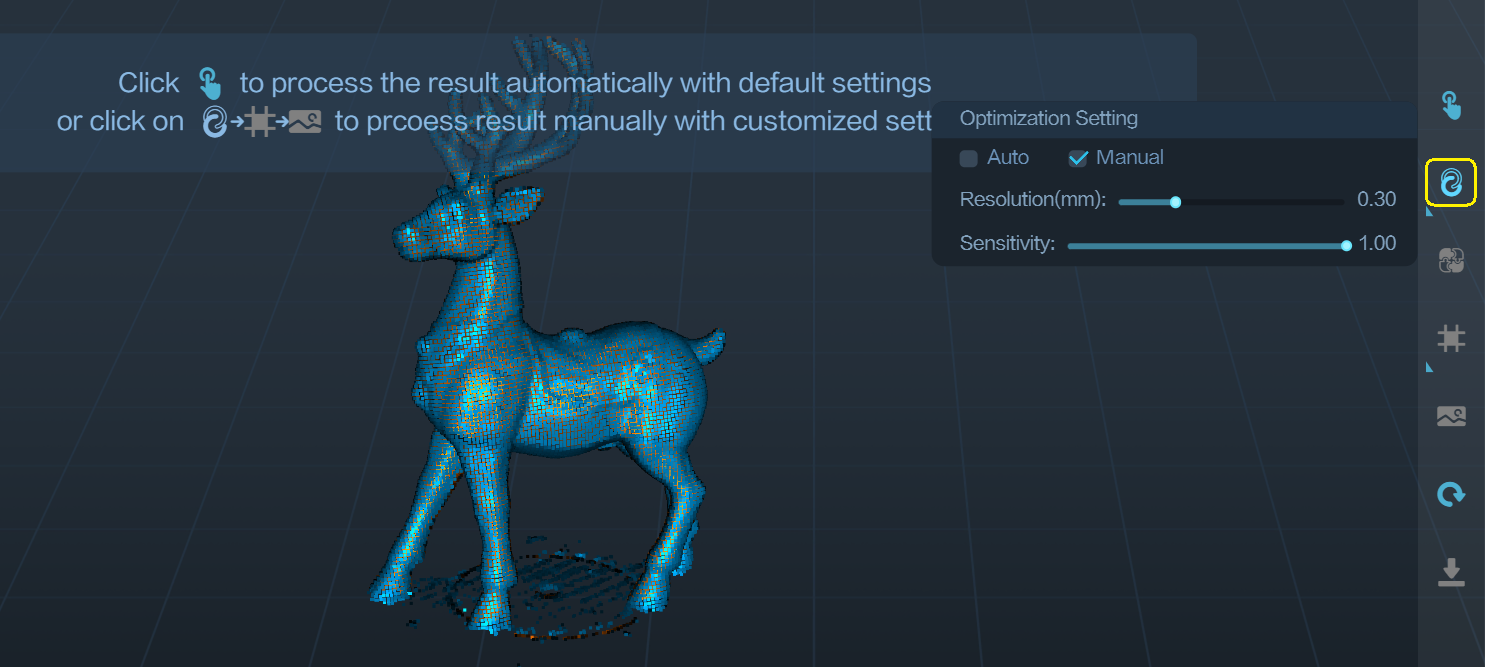
スキャンプロセス後, 点群のスキャンされた複数のフレームを融合するには、点群の最適化を実行する必要があります。 (数百または数千のフレーム) より高品質の点群を取得します.
解像度はこのプロセスの重要なパラメータの 1 つです. 解像度設定を小さくすると、モデルの詳細がより多くキャプチャされますが、処理時間が長くなる可能性があります。. しかし, 解像度の設定が小さすぎる, 0.15mmなど, モデルの一部が欠落する可能性があります.
小さな物体を扱うとき, 30cm以下のものなど, またはより詳細な情報を求める場合, 解像度を0.3mmまたは0.25mmに設定することをお勧めします。.
感度: この値が大きいほど, より多くのポイントを保持できる. 値が小さいほど, より多くのポイントが除外されます.
Creality Scan ソフトウェアを使用すると、ユーザーはポイントクラウドの最適化を複数回実行できます. 例えば, 現在の最適化結果に満足できない場合, パラメーターを変更して、点群の最適化ステップを再実行できます。.
ワンクリックプロセス
ワンクリック処理は、3D スキャナーの使用経験がほとんどない新規ユーザー向けに設計されています。. より良いスキャン品質が必要な場合, ワンクリック処理を使用せず、代わりに各処理ステップのパラメータを手動で調整することをお勧めします。.
モデルの編集
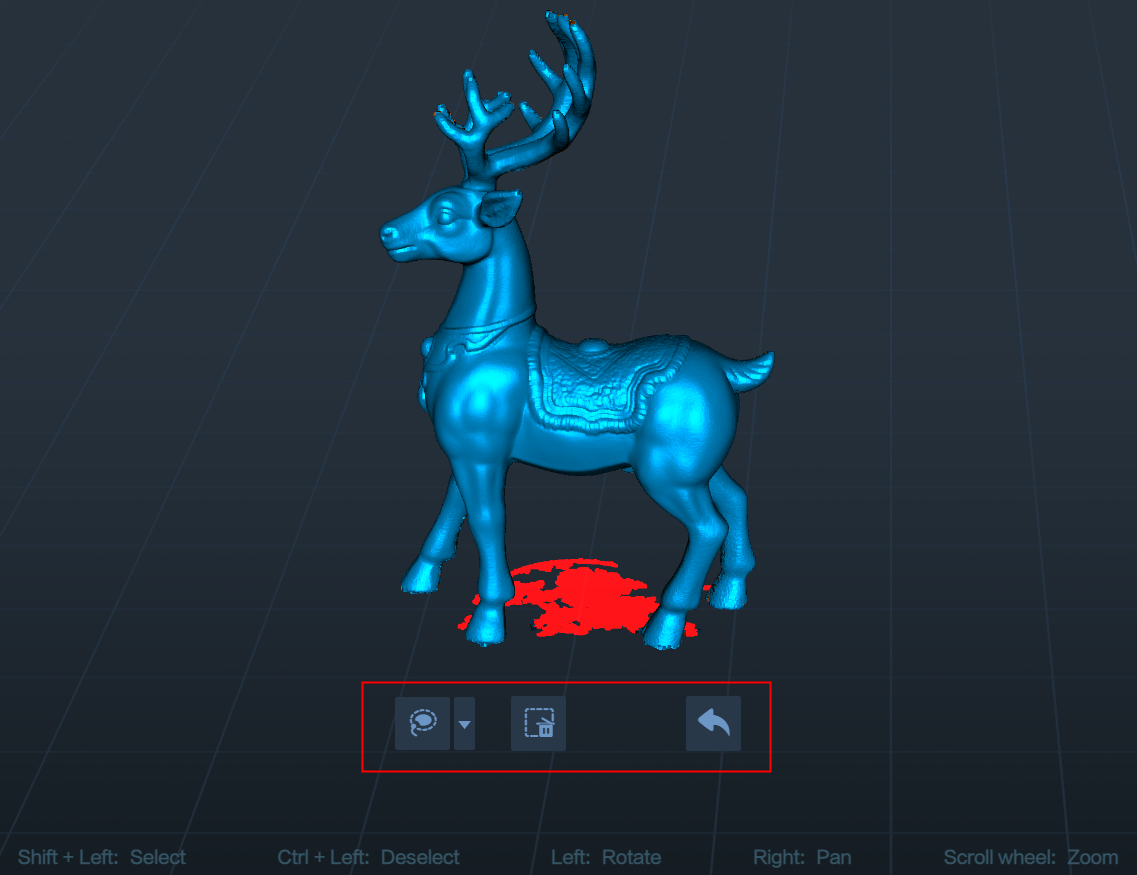
Creality Scan は点群編集機能を提供します. 点群の最適化が完了した後, ユーザーは点群内の不要な点を選択して削除できます.
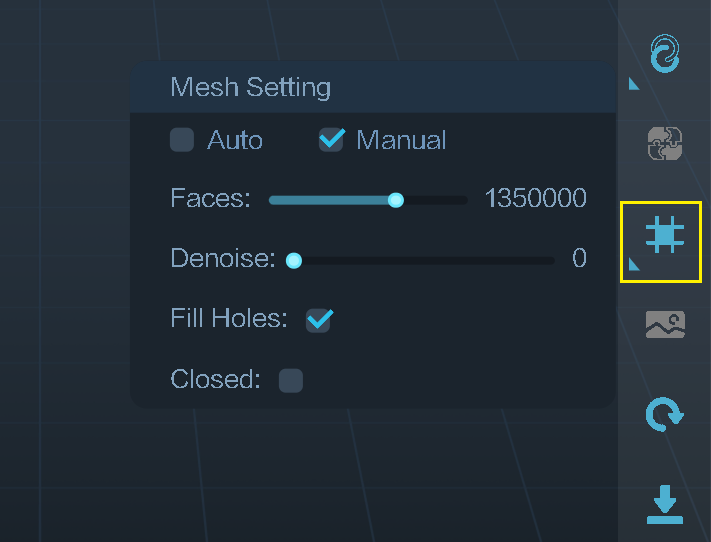
メッシング
メッシュ操作により、点群データが三角形メッシュ モデルに変換されます。.

メッシュのプロセス中, 生成されたメッシュの面の数を手動で構成できます, メッシュの滑らかさのレベルを調整する, 穴を埋めてモデルを閉じるかどうかを選択します.
メッシュ内の面が増えるほど, モデルが細かいほど, ただし、メッシュの生成にも時間がかかります.
テクスチャリング
Ferret スキャナには高解像度 RGB カメラが搭載されています, 3D モデルのトゥルーカラー テクスチャのキャプチャを可能にします.
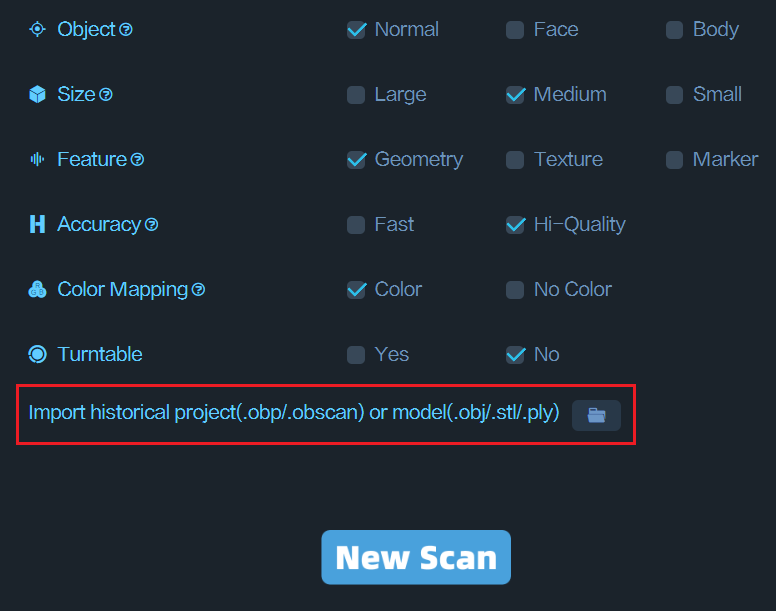
歴史的プロジェクトのインポート
パソコンでスキャンする場合, 後処理が完了するまで待つ時間がない場合, 「完了」をクリックできます” そして「歴史的プロジェクトのインポート」を使用します。” 将来的には、スキャン プロジェクト ファイルをソフトウェアにインポートしてさらに処理できる機能が追加される.
モバイルスキャン, パソコン処理
Ferret はモバイル スキャンをサポートします, 優れた携帯性を提供します. 多くの Android スマートフォンのメモリは 8GB しかありません, そしてiPhone 12 メモリが4GBしかない, 多くのコンピュータには 16GB のメモリが搭載されていますが、. 最初に携帯電話でスキャンすることを選択できます. 携帯電話でのスキャンが完了したら, モデルを保存する, メインインターフェイスに戻る, 次にプロジェクトをエクスポートします. 後で, あなたのPC上で, 「歴史的プロジェクトのインポート」を使用します。” スキャンしたプロジェクトファイルをインポートしてコンピュータ上で処理する機能, したがって、より高品質の 3D モデルが得られます.
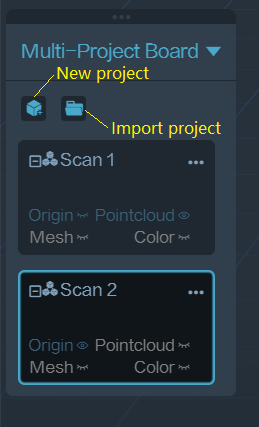
複数プロジェクトのマージ
各スキャンでキャプチャできるのはオブジェクトの一部だけです, その後、複数プロジェクトのマージ機能を使用して、それらを完全なモデルに結合できます。. これは、より大きなオブジェクトをスキャンする場合に非常に役立ちます.
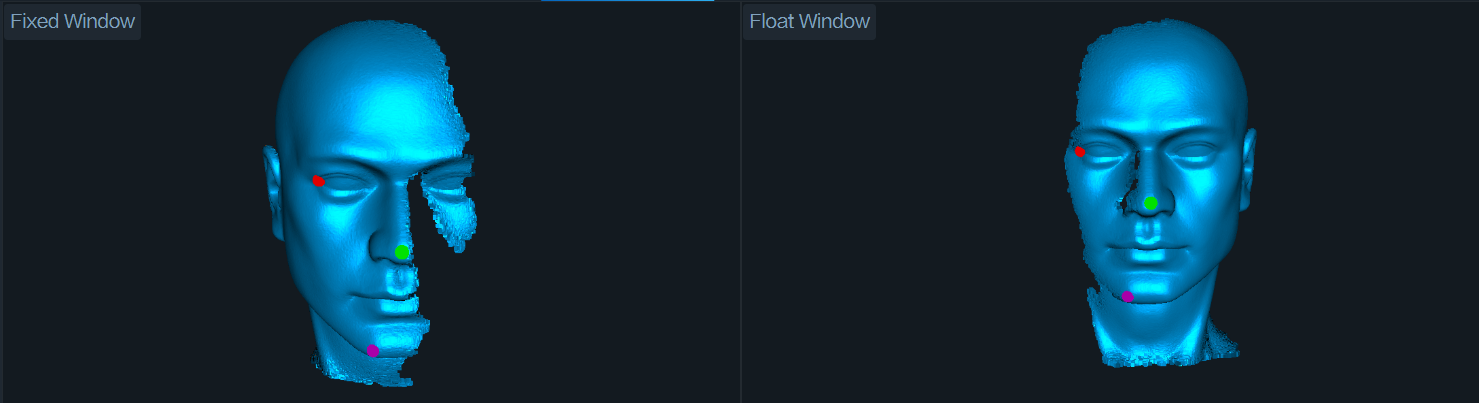
オブジェクトの底部をスキャンする方法?
オブジェクトの底部をスキャンする必要がある場合, オブジェクトをテーブルの上に置き、最初に目に見える部分をスキャンすることができます. それから, 新しいプロジェクトを作成し、別のスキャンのためにオブジェクトを横向きまたは逆さまに配置します。. マルチプロジェクト マージ機能を使用して、これら 2 つの点群セットをマージします。, オブジェクトの完全な 3D モデルを作成する. 両方のスキャン中, 十分な重なり合う領域がキャプチャされていることを確認してください.
最初のスキャンが完了し、点群の最適化を実行した後, 「新しいプロジェクト」を選択すると、新しいスキャンを開始できます。” マルチプロジェクトマージのページ, 融合した点群を自動または手動で結合できます. 以下は手動による複数プロジェクトのマージの例です。.

ケースのスキャン
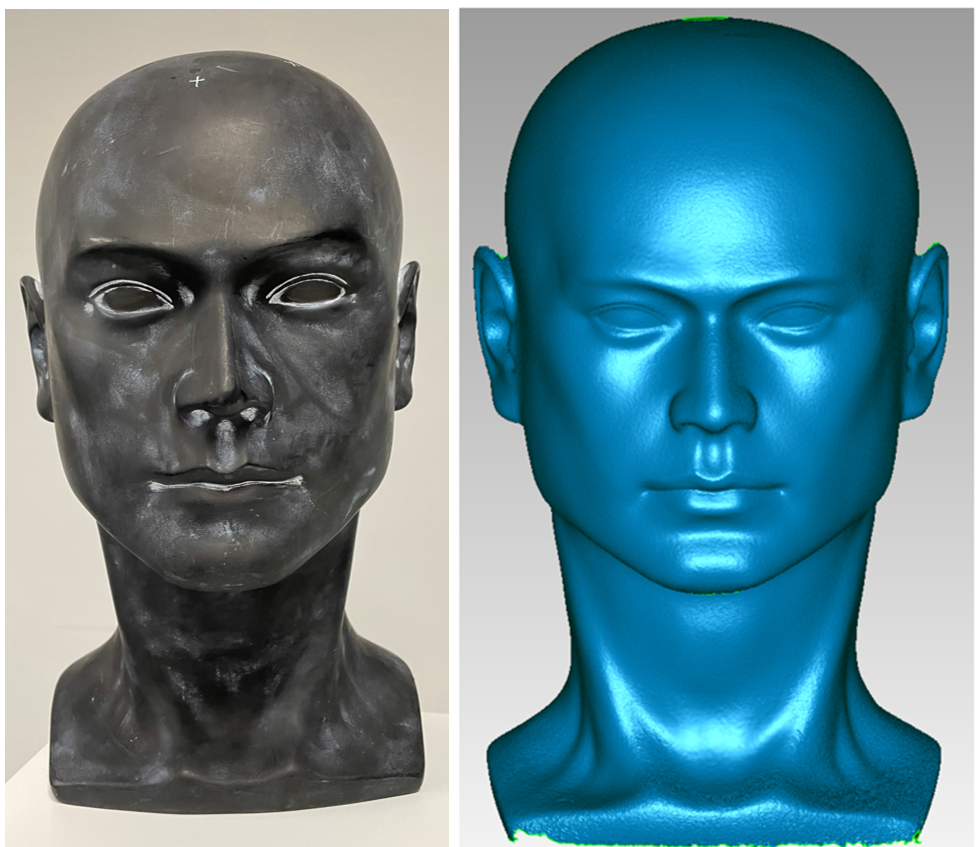
人間の顔
CR-Scanフェレットの場合, 人間の顔はスキャンするのが最も簡単なターゲットの 1 つです. 初めて3Dスキャナーを使う方へ, 顔をスキャンすることから始めることをお勧めします.
推奨スキャン設定: 顔 | ジオメトリ | 高品質 | 色.
より詳細なメッシュモデルを取得したい場合, 点群の最適化ステップ中, 点群の解像度を手動で小さい値に設定することをお勧めします。, 0.3mmなど. より滑らかなメッシュモデルが必要な場合, 解像度をより大きな値に設定できます, 0.5mmなど.
顔をスキャンする際の注意事項
(1) スキャンされる人は、スキャンが完了するまで静止し、表情を変えないようにしてください。.
(2) フェレットのスキャンプロセス中は目を開けていても安全です.
(3) スキャン中は眼鏡の着用を避けてください.
(4) ゆるくてふわふわした髪はスキャンが難しくなります, それでスキャン中に, 帽子をかぶることを選択できます, トラッキングを良くするためにドライシャンプーを塗布してください, または女性の場合は髪を結びます.
以下は、Ferret スキャナーを使用してナナの顔をスキャンした例です.

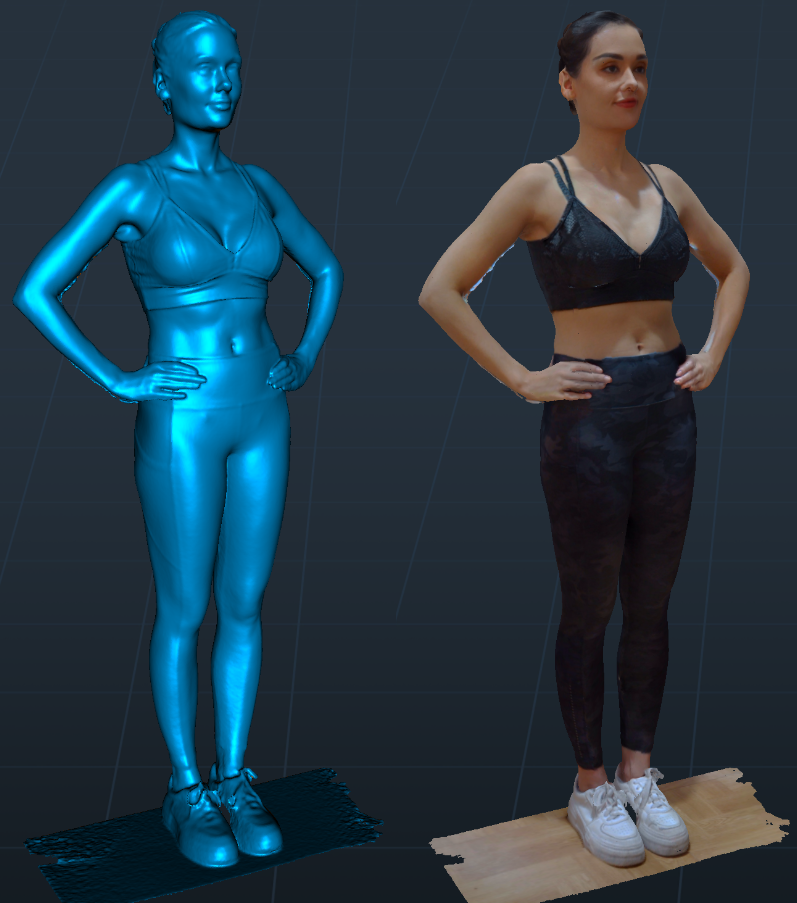
全身
推奨されるスキャン設定: 体 | ジオメトリ | 速い | 色.
人体スキャンに関する注意事項
(1) スキャンプロセス中, スキャン対象者とその衣服は、スキャンが完了するまでできるだけ動かないようにする必要があります。.
(2) 正面からスキャンを開始することをお勧めします, 頭の順にスキャン, 胸, ウエスト, そして足, 上から下まで.
(3) 誰かがターンテーブルの上に立つことができたら, より良いスキャン結果が得られる可能性があります.
以下はナナのボディスキャンの例です.
全身をスキャンするにはどのくらい時間がかかりますか?
スキャナーの操作に慣れている方, 以内に全身スキャンを完了できます 3 分 (i7 CPU, エヌビディア 1060 GPU). ここでの時間はスキャン時間を指します, 処理時間ではありません.
大きなオブジェクト
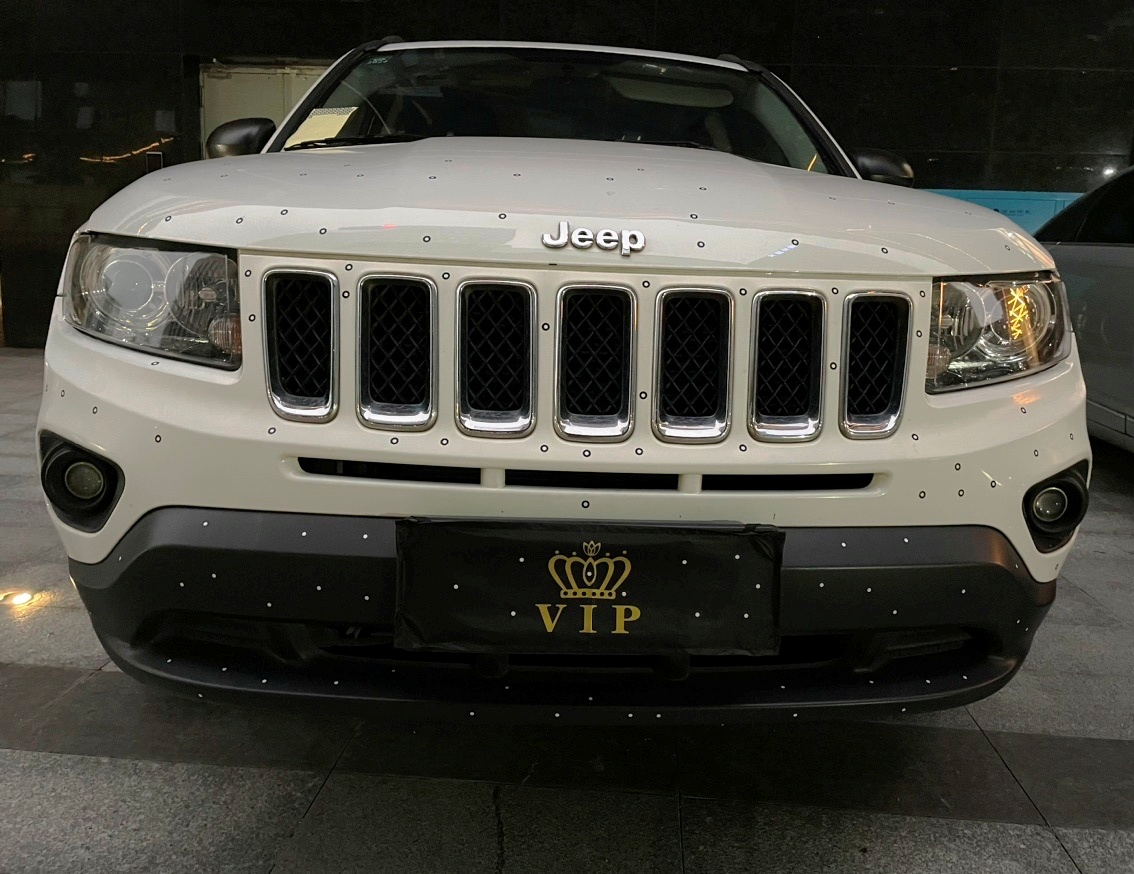
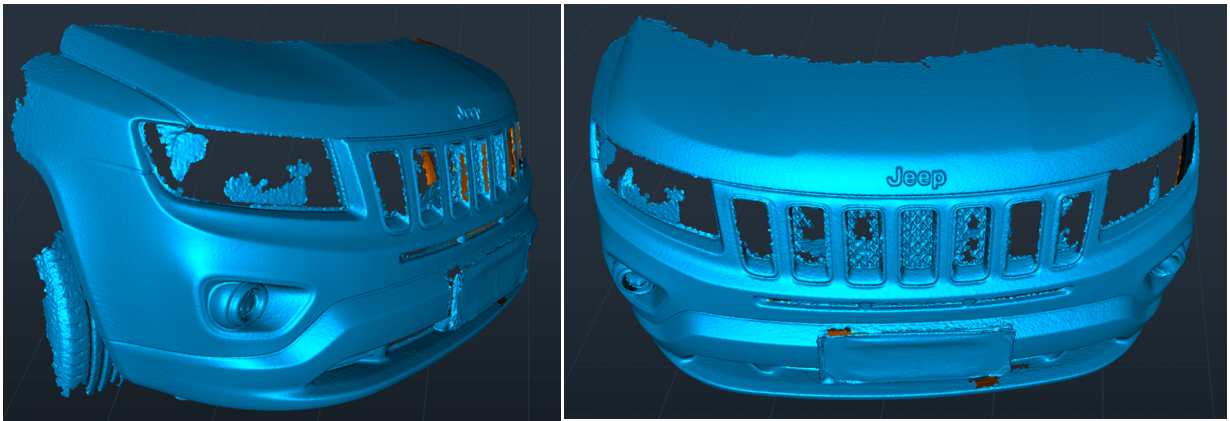
車のバンパー
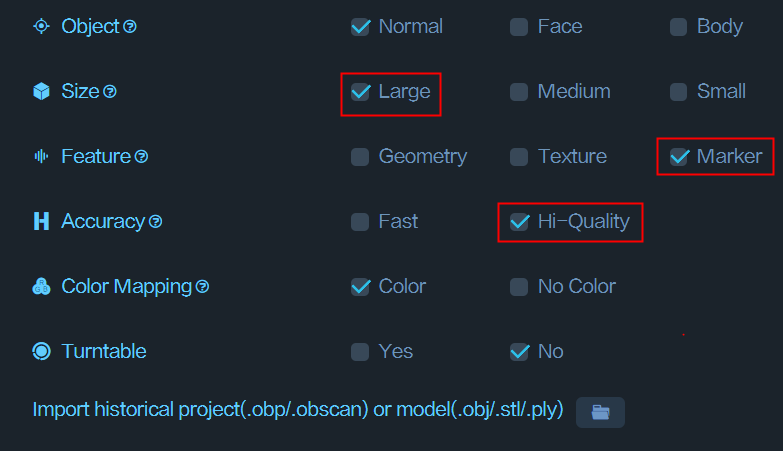
スキャンにはマーカーモードを使用することをお勧めします. 以下の場合, 約 150 車両前部に内径6mmの円形マーカーポイントを設置.
透明なヘッドライトに注意してください, 粉末をスプレーしない場合, 生成された 3D モデルのこの領域に空洞が発生します。.
スキャン設定:大きなオブジェクト, モードの選択, 高品質, 分解能0.8mm.
取得されたメッシュ モデルには次の内容が含まれます 2.23 百万の顔.
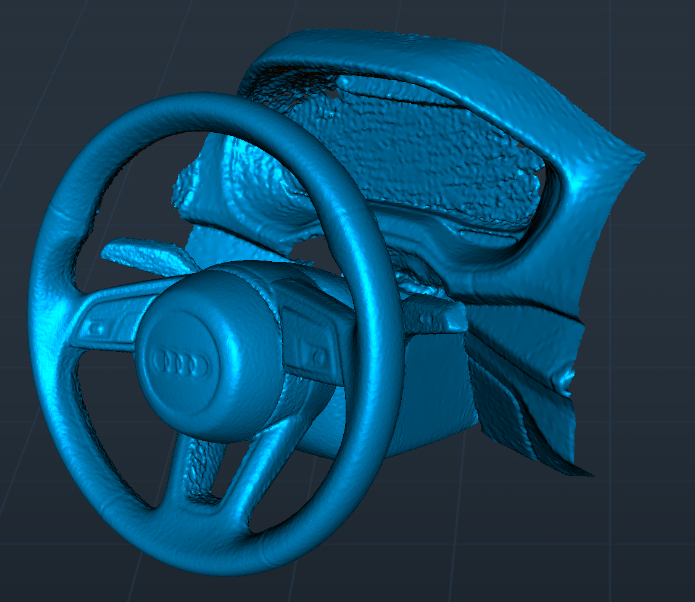
ハンドル
スキャン設定: 大きなオブジェクト, ジオメトリ, 高品質, 分解能0.5mm.
オートバイ
オートバイをスキャンするケースを提供してくれた Herman Hsu に感謝します. 合計 6500 フレーム点群が使用されました.
スキャン設定: 大きなオブジェクト, 高精度, テクスチャモード.
コンピューター: インテル i5-10400H CPU, 16 GB RAM, Nvidia GeForce MX250 GPU.
この場合, 点群の解像度は 1mm に設定されています.
https://www.youtube.com/watch?v=zsrRhbN6XjQ&t=8s
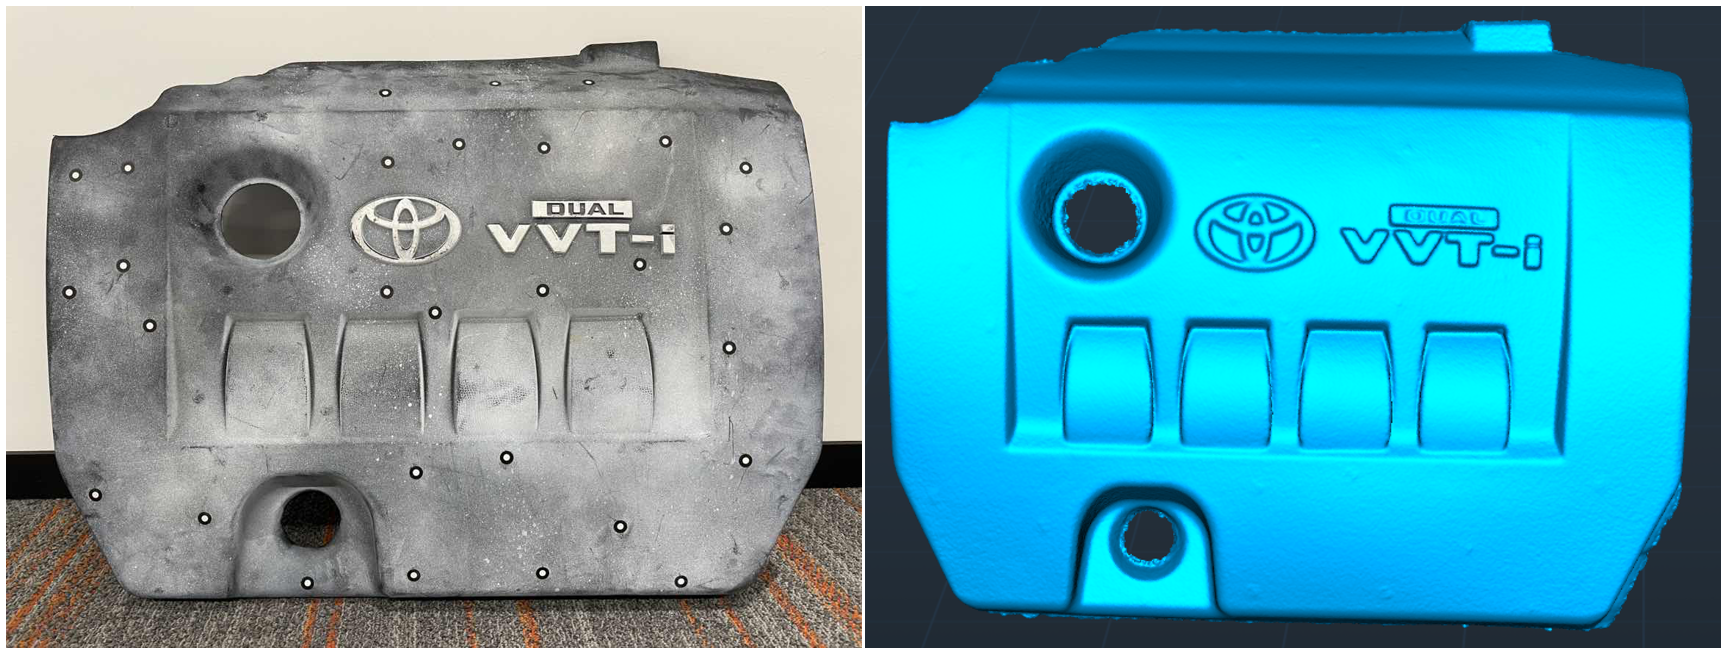
エンジンフードパネル
この例では, エンジンフードパネルの寸法は592mm x 453mm x 103mmです。. マーカーの内径は6mmです。, 点群の解像度は 0.5mm に設定されています. スキャン設定は以下のとおりです.
エンジン フード パネルの表面はほぼ平らで、幾何学的な特徴はほとんどありません。. スキャンにはマーカーポイントモードの使用をお勧めします. ターゲットの表面にプロトタイプのマーカー ポイントを配置します。, マーカーモードでスキャンを実行します. スキャン結果を以下に示します.
中型オブジェクト
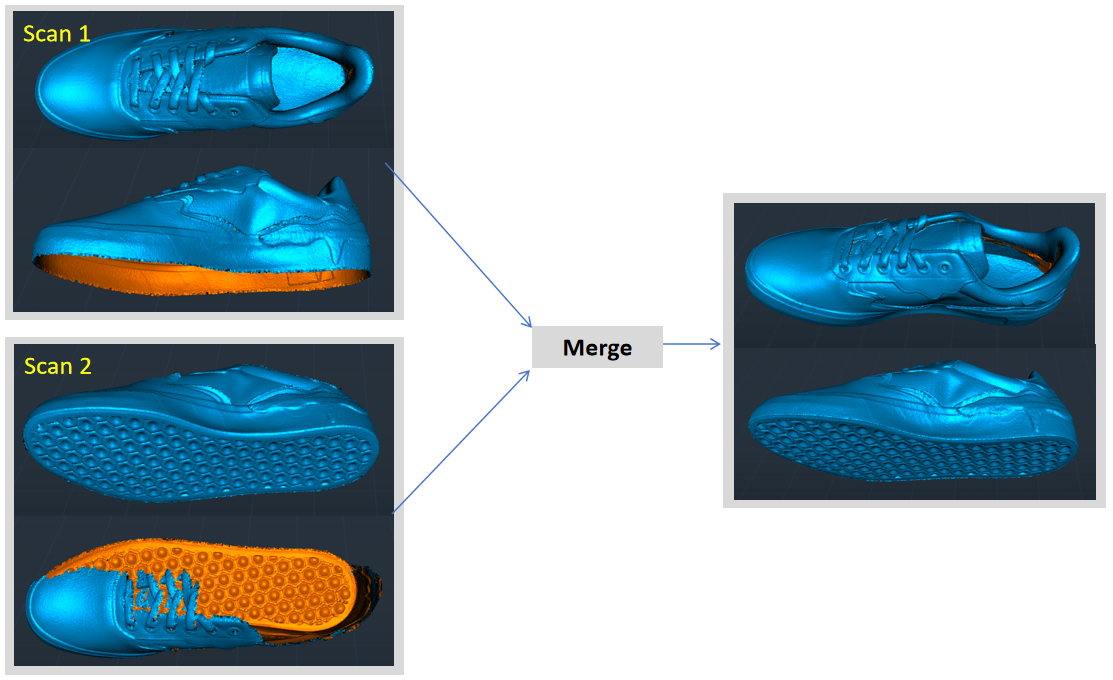
靴
上記の靴をスキャンする場合, まず靴をテーブルの上に置き、目に見える部分をスキャンして点群スキャンを取得します。 1. それから, 靴をひっくり返して底をスキャンしてスキャンを取得します 2. 結合ページで, これら 2 つの点群を結合して、靴の完全なモデルを作成できます。, 以下に示すように.
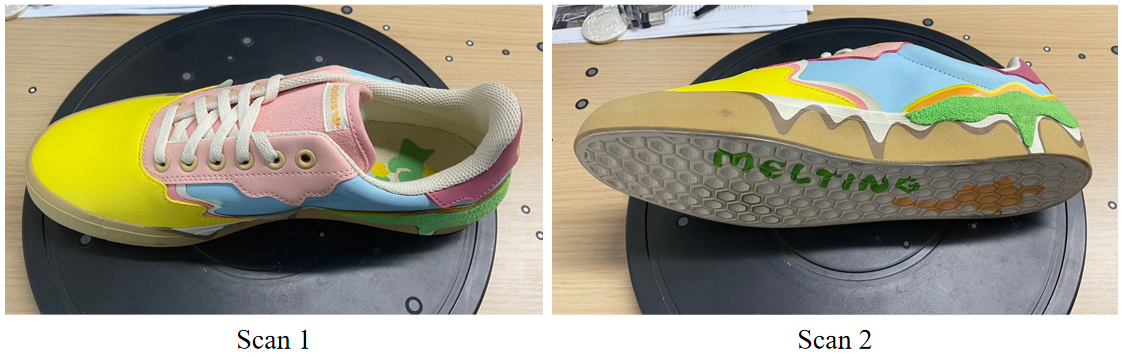
スキャン設定: 中型オブジェクト, テクスチャ, 高品質, 解像度 = 0.25mm.
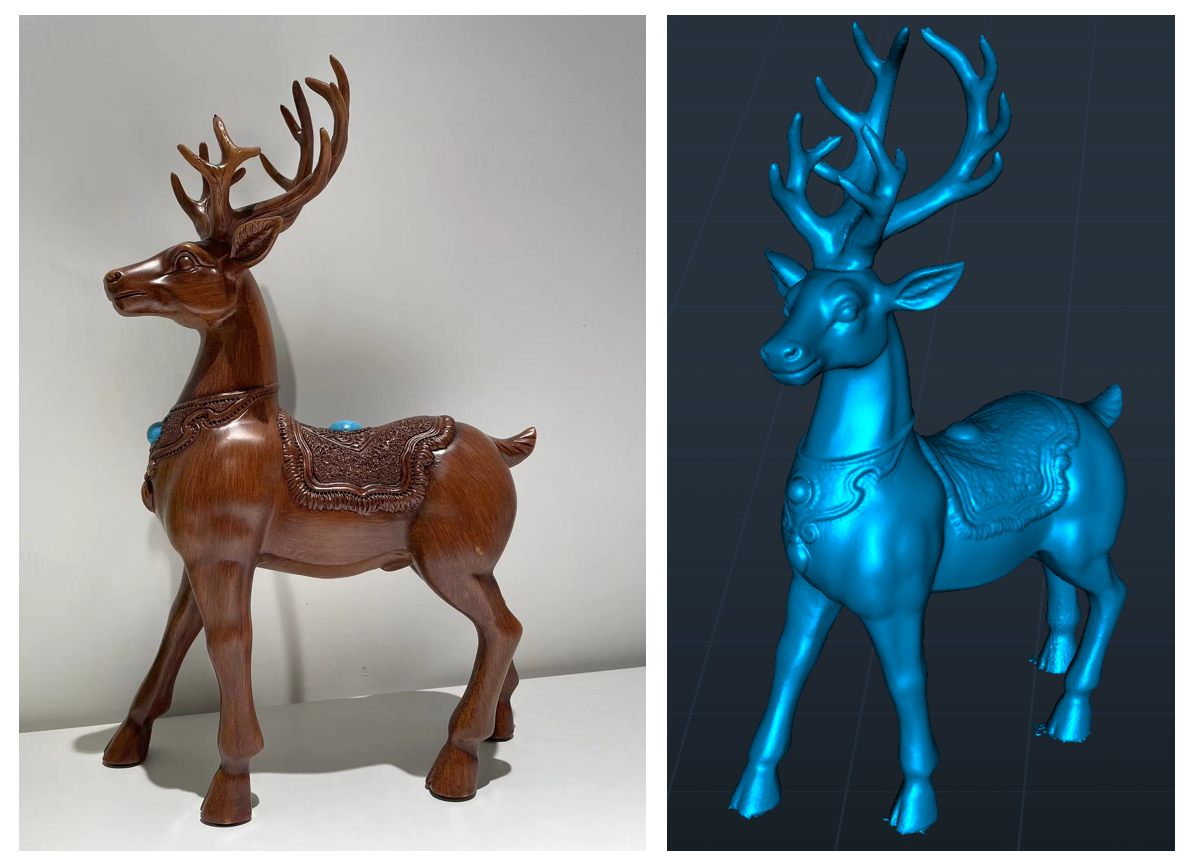
彫刻
こちらは高さ38cmの鹿の木製彫刻のスキャンケースです。.
スキャン設定: 中型オブジェクト, ジオメトリモード, 高品質, 解像度 = 0.3mm. メッシュ面の数は2000kです.
黒い物体
Ferret スキャナーを使用すると、粉体塗装を必要とせずに黒いオブジェクトを直接スキャンできます。, ユーザーに利便性を提供する. しかし, 粉体塗装が可能な場合, スプレーを使用するとスキャンプロセスがさらに簡単になります。.
黒い物体をスキャンするときのポイント: IR カメラの露光時間を長くして、IR 画像の十分な明るさを確保します。.
黒毛モデルのスキャン設定: 中オブジェクト, 高品質, ジオメトリモード, 解像度 = 0.3mm.
小さな物体
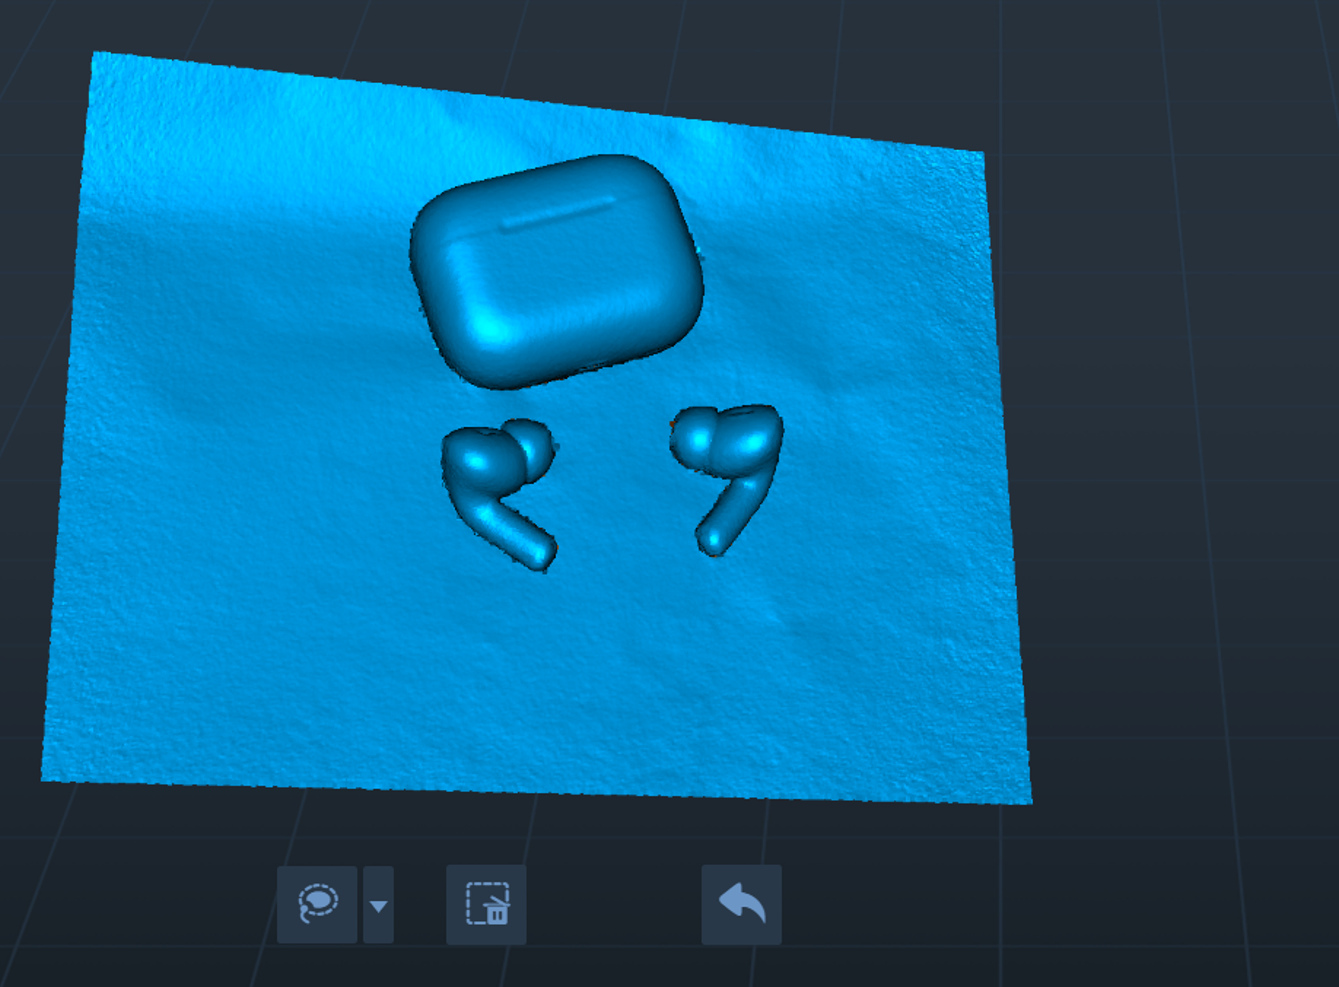
エアポッズプロ2
この種の小さなオブジェクトの場合, スキャンにはテクスチャ モードを使用することをお勧めします.
特定のスキャン構成: 小さな物体, 高品質, テクスチャモード, 分解能0.3mm.
事前にテーブルトップにいくつかのマーカーポイントを適用する必要があることに注意することが重要です。, 下の画像に示すように.
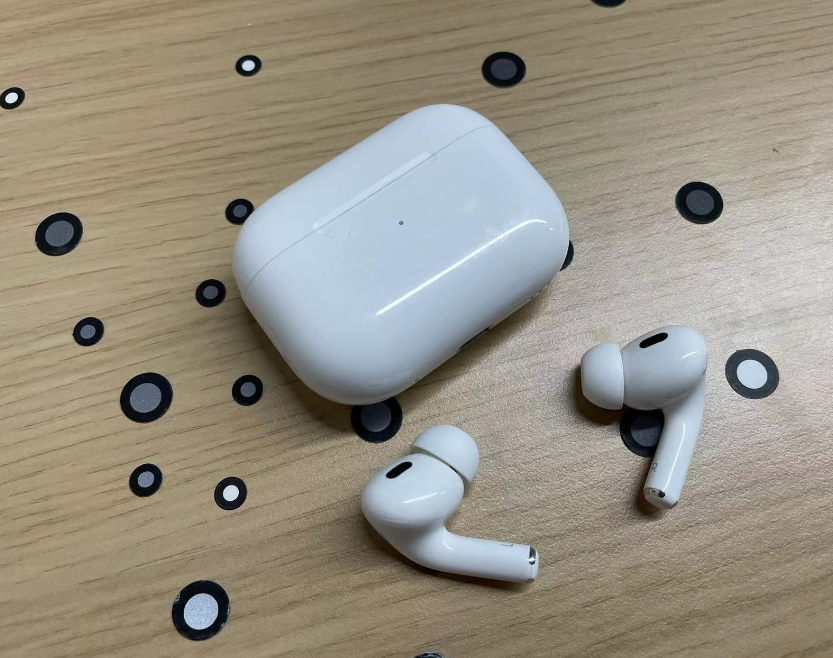
また, 「フラットベースを除外する」オプションを選択しないように注意してください。, スキャンウィンドウの下部に表示されるように. ソフトウェアは点群を結合するためにテーブルトップからフィーチャを抽出する必要があります.

結果のモデルは次のとおりです:
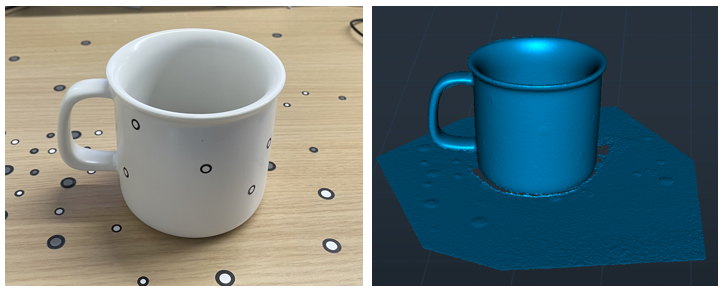
白いカップ
マーカーモードを使用して白いカップをスキャンできます.
スキャン設定: 小さな物体, 高品質, モード選択, 解像度 = 0.3mm.
屋外スキャン
Ferret スキャナは、太陽光の強度が 30,000 ルクス未満の屋外でも使用できます。.
ガイドライン:
1)直射日光の当たらない環境でスキャンしてみてください. もし可能なら, 太陽光が強すぎない朝または夕方にスキャンしてください。.
2)日差しが強いときは, 傘やその他の手段を使用してスキャナーを直射日光から守ると効果的です。.
屋外スキャンのチュートリアル:
