この記事はもともと公開されました lihgtburn ビリエルベンによる.
Gweike Cloudにはいくつかの癖があります. 一部のユーザーは、Lightburnでそれに接続するのに苦労しました, Z軸が設計されている方法のために、頭がクラッシュした人もいます, カメラをセットアップすることも少し難しい場合があります. それで, 学んだことすべてを含む投稿をまとめると思った, この投稿にお気軽に貢献してください。そうすれば、私たち全員にとって素晴らしい中央リソースになることができます.
GweikeマシンがLightburnで動作する方法は 変更されました (簡単になりました) ライトバーンのように 1.4.04. 「古い」’ アーカイブの目的のための現在の方法の下に方法がリストされています.
Lightburnの現在のバージョンでGweike Cloud Proをセットアップ/使用する方法:
LightburnがG-Weike Cloudレーザーで動作しているかどうかを検出するようになりました, そして今すぐZを正しく処理します (Autoは、材料の厚さに基づいて適切なZ高さを設定します). これは、Lightburnの以前のバージョンで行う必要がある17材料の厚さ計算を行う必要がないことを意味します, 素材の実際の厚さを材料の厚さフィールドに入れることができます.
ウィンドウズ
- レーザーコントローラーからコンピューターにUSBケーブルをプラグインします. (注記: 2つのポートがあります, カメラ用に1つ、レーザーコントローラー用)
- このビデオに従って、Gweike Webサイトからドライバーをインストールします:
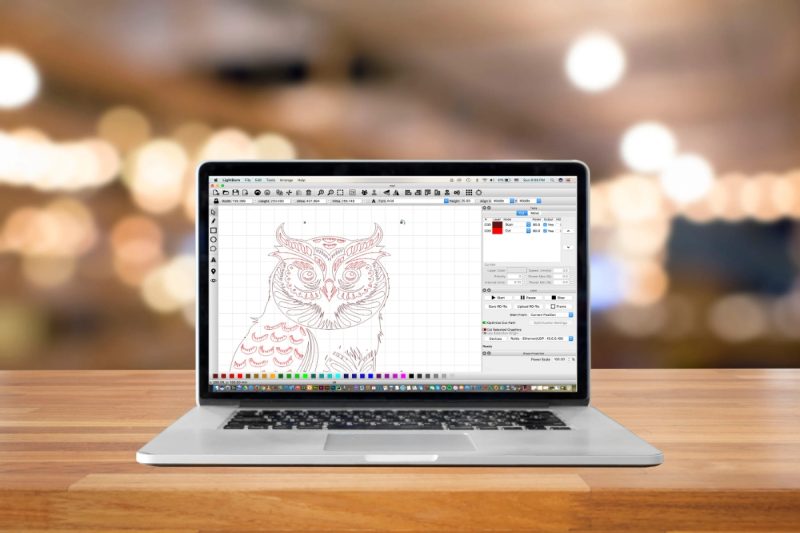
- オープンライトバーン
- レーザーウィンドウ>デバイス>私のレーザーを見つけてください (Ruida 644xg, 右後部)
- レーザーウィンドウ> セットアップしたばかりの正しい通信ポートとGweike Cloud/Ruidaマシンを選択します
- 編集メニュー>デバイス設定> z = onを有効にします, zの動きを最適化=オンにします, 相対Zの動き=オフ
- カット/レイヤーウィンドウ> セットマテリアル (んん) 素材の厚さに.
- マテリアル設定を入力します: GWEIKECLOUDパラメーター設定テーブル – Eu Gweike Cloud
- デザイン/フレーム/カット.
このプロセスを使用すると、カットの開始時に頭が下がることが保証されます, そして最後に家の位置にまっすぐに移動します. 上記をフォローしてもまだクラッシュしていません.
マック
- レーザーコントローラーからコンピューターにUSBケーブルをプラグインします. (注記: 2つのポートがあります, カメラ用に1つ、レーザーコントローラー用). レーザーカッターのパワー.
- macosをダウンロードします 11/12 このサイトのドライバー: VCPドライバー
- .dmgファイルを開きます (ダウンロードで) .dmg内からインストーラーをコピーします, Macのアプリケーションフォルダーに.
- インストーラーを実行します. 「承認を待っている」というエラーがある場合” システム設定に移動します > プライバシーとセキュリティ 下にスクロールします. 「アプリケーションからのシステムソフトウェア」というメッセージがあります。” ロードがブロックされました. クリック 許可する. インストーラーが完了します.
- オープンライトバーン, ポートは、デバイスボタンの横にあるドロップダウンに表示されます。 レーザ ウィンドウ.
- レーザ ウィンドウ>デバイス>私のレーザーを見つけてください (Ruida 644xg, 右後部)
- レーザ ウィンドウ> セットアップしたばかりの正しい通信ポートとGweike Cloud/Ruidaマシンを選択します
- 編集 メニュー>デバイス設定> zを有効にします =オン, Zの動きを最適化します =オン, 相対Zの動き =オフ
- カット/レイヤー ウィンドウ> セットマテリアル (んん) 素材の厚さに.
- マテリアル設定を入力します: GWEIKECLOUDパラメーター設定テーブル – Eu Gweike Cloud
- デザイン/フレーム/カット.
このプロセスを使用すると、カットの開始時に頭が下がることが保証されます, そして最後に家の位置にまっすぐに移動します. 上記をフォローしてもまだクラッシュしていません.
ヒント
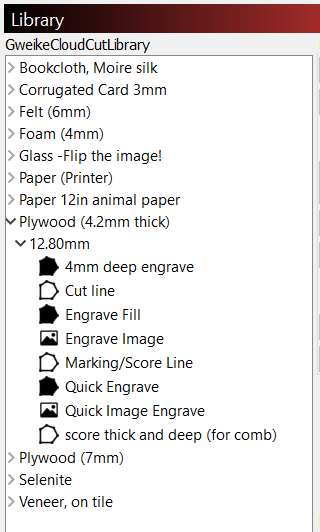
図書館に保存します
に保存するとき 材料図書館 gweikeクラウドの場合、素材を入力する必要があります (んん) 「厚さ」に値” 設定で保存するフィールド.
オフセット / パスごとにzステップ
これらの設定を使用する場合 (例えば. カットや彫刻がある仕事でラスター彫刻をしている間に少し焦点を合わせる (オフセット), または、各パスで厚い素材で材料に下に移動して、カットの焦点が向いているように (パスごとのステップ), カット設定エディターからアクセスできます (レイヤーをダブルクリックします). このプレビューに示されている方向は、Gweikeが示す動作に対応しています. 予想通りに機能します. 負の値 (「アウト」の方向を表示する) 材料/アップから離れます, そして、正の値については反対です.
これらの設定は、材料に複利されています (んん) 設定. したがって、最初に素材を正しく設定してください (上記のように), 次に、Zオフセット/ Zステップで、レーザーヘッドをその高さから上下に移動する量を追加します/ Zステップ. たとえば、彫刻のために少し焦点を合わせたい場合は、Zオフセットフィールドに1mmを入れます.
よくある質問
イーサネット経由でLightburnに接続できますか?? いいえ. 彼らのボードは、画像データを送信する目的でのみイーサネットのみをサポートしています, コントローラーに接続していません. ケーブルを介してクラウドをルーターに接続する場合でも, まだWiFiを使用して制御データを送信しています.
これはすべて、Lightburnがイーサネットを介してマシンを制御する方法がないことを意味します, 完全に接続できないからです. 私たちのさらなる混乱を避けるために、彼らは以下で彼らのウェブサイトを更新することを提案しました;

Gweike CloudはLightburn Bridgeで動作しますか? いいえ. 上記と同じ理由.
私が仕事をしたとき、マシンはライトアップしますが、彫刻/切断しません. これは通常、作業をエッジに近づけすぎることによって引き起こされます, カットは、xとyの両方の境界から少なくとも0.5mmで配置する必要があります. 彫刻はさらに多くのことをする必要があります (特にX軸で) Gweike Cloudソフトウェアでこれらの境界を見ることができます.
変更 & アップグレード
- ロータリーアップグレード 設定情報.
- 使用するためにK40レーザーヘッドをGWeikeクラウドに適合させるアダプター 非専用18mm 2″ レンズ. ありがとう @jkwilborn これを見つけるために!
アーカイブ: Lightburnの前にLightburnでGweike Cloud Proをセットアップ/使用する方法 1.4.04:
GweikeマシンがLightburnで動作する方法は 変更されました (簡単になりました) ライトバーンのように 1.4.04. 「古い」’ アーカイブの目的のために、方法を以下にリストします.
ウィンドウズ
- レーザーコントローラーからコンピューターにUSBケーブルをプラグインします. (注記: 2つのポートがあります, カメラ用に1つ、レーザーコントローラー用)
- このビデオに従って、Gweike Webサイトからドライバーをインストールします:
- オープンライトバーン
- レーザ ウィンドウ>デバイス>私のレーザーを見つけてください (Ruida 644xg, 右後部)
- レーザ ウィンドウ> セットアップしたばかりの正しい通信ポートとGweike Cloud/Ruidaマシンを選択します
- 編集 メニュー>デバイス設定> zを有効にします =オン, Zの動きを最適化します =オン, 相対Zの動き =オフ
- カット/レイヤー ウィンドウ> セット 材料 (んん) あなたの素材の17の厚さに (たとえば、3mmプライの場合, 17-3 = 14を計算します, したがって、置きます 14 素材に(んん) 分野.
- マテリアル設定を入力します: GWEIKECLOUDパラメーター設定テーブル – Eu Gweike Cloud
- デザイン/フレーム/カット.
このプロセスを使用すると、カットの開始時に頭が下がることが保証されます, そして最後に家の位置にまっすぐに移動します. 上記をフォローしてもまだクラッシュしていません.
マック
- レーザーコントローラーからコンピューターにUSBケーブルをプラグインします. (注記: 2つのポートがあります, カメラ用に1つ、レーザーコントローラー用). レーザーカッターのパワー.
- macosをダウンロードします 11/12 このサイトのドライバー: VCPドライバー
- .dmgファイルを開きます (ダウンロードで) .dmg内からインストーラーをコピーします, Macのアプリケーションフォルダーに.
- インストーラーを実行します. 「承認を待っている」というエラーがある場合” あなたに行きます システム設定 > プライバシーとセキュリティ 下にスクロールします. 「アプリケーションからのシステムソフトウェア」というメッセージがあります。” ロードがブロックされました. クリック 許可する. インストーラーが完了します.
- オープンライトバーン, ポートは、次のドロップダウンに表示されます デバイス のボタン レーザ ウィンドウ.
- レーザ ウィンドウ>デバイス>私のレーザーを見つけてください (Ruida 644xg, 右後部)
- レーザーウィンドウ> セットアップしたばかりの正しい通信ポートとGweike Cloud/Ruidaマシンを選択します
- 編集 メニュー>デバイス設定> zを有効にします =オン, Zの動きを最適化します =オン, 相対Zの動き =オフ
- カット/レイヤー ウィンドウ> セット 材料 (んん) あなたの素材の17の厚さに (たとえば、3mmプライの場合, 17-3 = 14を計算します, したがって、置きます 14 素材に(んん) 分野.
- マテリアル設定を入力します: GWEIKECLOUDパラメーター設定テーブル – Eu Gweike Cloud
- デザイン/フレーム/カット.
このプロセスを使用すると、カットの開始時にヘッドが下に移動し、最後にホームポジションにまっすぐ移動します. 上記をフォローしてもまだクラッシュしていません.
カメラのセットアップ
カメラのセットアップには2つのステージがあります, カメラレンズの校正, そしてそれをします カメラアライメント.
- USBケーブルをマシンのカメラポートとPCに差し込み、レーザーをオンにします.
- でキャリブレーションドットを印刷します 50% スケーリングして、それを平らなものに接着します (例:波形カード) したがって、魚眼のレンズのために角度でそれを支える必要があるので、パターンは歪んでいません.
- レーザーツール> レンズキャリブレーションウィザード > Shunccmを選択してください, 魚眼レンズ, プリセットなし
- クラウドカメラは魚の目です, だから最初の後 (フラット/センター) 捕獲, カメラに向かってドットパターンを傾けるには、正しくキャプチャするようにする必要があります (平らに横たわらないでください). カメラとドットはそれらをキャプチャするときはまだある必要があります。 (例えば. ポストインノートの背の高いスタック), カメラに向かって外側の端を傾ける, フロントアクセスパネルを使用しました (ハニカムをスライドさせるドア) カメラを非常に維持するためにドットを動かして. マシン内のストック照明は不均一であるため、2つのオーバーヘッドランプをセットアップしてさらに追加します. ドットパターンがカメラビューで直立していることを確認したとき、私は最高のキャプチャを持っていました (「トップ’ 長い辺の方は底よりもドットが少ない).
- このメニューの材料の厚さはZ軸を移動しません, キャリブレーションのためにバックエンドで使用されます. したがって、このメニューを開く前に、Z軸を正しい焦点高さに移動させるためにマシンを取得する必要があります。. を使用します 動く 材料の焦点距離に距離を変更することにより、これを行う窓 (方程式17厚さによって与えられます) 例えば. 材料が厚さ3mmの場合, 距離に14mmを入力し、Zダウンアローを押してください (方向キーの左下) 頭を下に移動します.
- レーザーツール > カメラアライメントを校正します > 固定位置 > shunccm (カメラフィードを確認できることを確認してください) [次へ]をクリックします.
- ここで材料の厚さを材料の実際の厚さに変えます (厚さ3mmの3mm)
- のようにアラインメントを完了します ガイド.
ヒント
図書館に保存します
Gweikeクラウドの材料ライブラリに保存するとき マテリアルライブラリ – Lightburnドキュメント 素材を入力する必要があります (んん) 価値 (例えば. 14 3mmの場合) 「厚さ」に” 設定で保存するフィールド. 材料名または説明の分野における実際の材料の厚さに注意することをお勧めします, 認識を容易にするため:
オフセット / パスごとにzステップ
これらの設定を使用する場合 (例えば. カットや彫刻がある仕事でラスター彫刻をしている間に少し焦点を合わせる (オフセット), または、各パスで厚い素材で材料に下に移動して、カットの焦点が向いているように (パスごとのステップ), カット設定エディターからアクセスできます (レイヤーをダブルクリックします). Gweikeクラウドの主なことは、方向が逆になっていることです. する ない ダイアログでイン/アウトインジケーターを通過します.
負の値はレーザーヘッドを材料に近づけ、ポジティブな値は材料からさらにそれを取ります. それが覚えておくのに役立つなら, Z軸が伝統的な垂直の軸であると想像してください; アップは正であり、ダウンは否定的です; パスあたりのZオフセットまたはZステップの正の値は、レーザーヘッドを上げます, ネガがそれを取り下げます.
これらの設定は、材料に複利されています (んん) 設定. したがって、最初に素材を正しく設定してください (上記のように) たとえば、3mm plyです 14, 次に、Zオフセット/ Zステップで、レーザーヘッドをその高さから上下に移動する量を追加します/ Zステップ. たとえば、彫刻のために少し焦点を合わせたい場合は、Zオフセットフィールドに1mmを入れます (ない 17-3= 14).
よくある質問
イーサネット経由でLightburnに接続できますか?? いいえ. 彼らのボードは、画像データを送信する目的でのみイーサネットのみをサポートしています, コントローラーに接続していません. ケーブルを介してクラウドをルーターに接続する場合でも, まだWiFiを使用して制御データを送信しています.
これはすべて、Lightburnがイーサネットを介してマシンを制御する方法がないことを意味します, 完全に接続できないからです. 私たちのさらなる混乱を避けるために、彼らは以下で彼らのウェブサイトを更新することを提案しました;
Gweike CloudはLightburn Bridgeで動作しますか? いいえ. 上記と同じ理由.
私が仕事をしたとき、マシンはライトアップしますが、彫刻/切断しません. これは通常、作業をエッジに近づけすぎることによって引き起こされます, カットは、xとyの両方の境界から少なくとも0.5mmで配置する必要があります. 彫刻はさらに多くのことをする必要があります (特にX軸で) Gweike Cloudソフトウェアでこれらの境界を見ることができます.
変更 & アップグレード
-
- ロータリーアップグレード 設定情報.
- 使用するためにK40レーザーヘッドをGWeikeクラウドに適合させるアダプター 非専用18mm 2″ レンズ. ありがとう @jkwilborn これを見つけるために!
