Here is a user guide to LightBurn based on the search results:
Preparation
- Clean the laser module: Use a dust-free cloth and alcohol to wipe the protective lens of the laser module before engraving to ensure the best engraving effect.
- Focus: Put down the wooden board in the working area, put down the focus bar, loosen the hand screw on the side of the laser module, and adjust the focus. When the focus bar is naturally vertically downward, it should contact the surface of the engraving material. Use the hand screw on the right to tighten it, and turn the focus bar clockwise until it is attracted by the magnet. Finally, plug in the laser module cable.
Install LightBurn Software
- Installation: Insert the TF card into the PC and double-click the .exe file to install the LightBurn software (the installation program in the TF card is only compatible with Windows 64-bit system. For other versions, please visit the official website https://lightburnsoftware.com/ to download).
- Download the configuration file: Download the configuration file TOOCA-Laser-1.7z and unzip it.
Configure LightBurn
- Open the software: Double-click to open the LightBurn software and click “Device”.
- Import configuration file: Click “Import” to import the .lbdev configuration file in the TF card: TOOCA-Laser-1.7z. After importing, the corresponding machine will be available in the device list. Select the machine and click OK to successfully configure.
- Set the unit: Click “Edit-Settings”, select “mm/min”, and click OK.
LightBurn Plane Processing
- Draw graphics: Draw graphics on the LightBurn canvas, such as a circle.
- Set parameters: Set parameters. Please refer to the recommended parameters and set them according to the actual materials used.
- Check the pattern: Click the border to check whether the pattern to be engraved is within the expected area of the material.
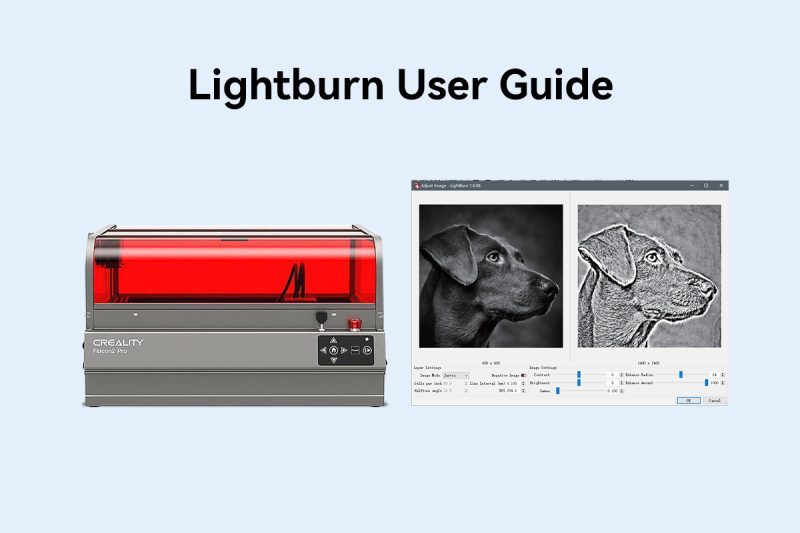
LightBurn Image Engraving
- Import pictures: Click “File-Import” to import pictures, set the position, size and rotation angle of the picture.
- Adjust the image: Right-click the image, select Adjust Image, set the image effect, and then click OK.
- Set power and speed: Set power, speed and times according to the recommended parameters. The higher the power or the slower the speed, the deeper the engraving effect; the lower the power or the faster the speed, the shallower the engraving effect.
- Save GCode: Click Save GCode to save the engraving file to the root directory of the TF card. Please make sure that the exported file format is .gcode, other formats such as .gc/.nc will not be recognized by the engraving machine.
Laser Engraving and Cutting with LightBurn
- Import or create projects: You can create projects from scratch or import them in various file formats such as AI, DXF, PNG, JPG, BMP, and SVG.
- Connect to the machine: You can connect to your machine via Ethernet/UDP, Serial/USB, or Datagram/USB.
- Configure job parameters: Import the design file into LightBurn, or draw the graphics directly on the LightBurn canvas and configure the parameters in the “Cutting/Layer” panel.
- Adjust the laser height and set the work origin: In the “Laser” panel of LightBurn, select “Current Position” from the “Start Position” drop-down list and determine the job origin position in LightBurn.
- Start the job: Select the design object in the canvas, and then in the “Laser” panel of LightBurn, click “Start” to start the laser job.
Please adjust the parameters and settings in the above steps according to your specific equipment and materials to obtain the best engraving effect.
Lightburn purchase link:
+1
+1
+1
+1
